Creating Your First Node
Today, you will learn how to create your first node for n8n.
Prerequisites
You have knowledge of:
JavaScript/TypeScript
REST APIs
Expressions in n8n
Install the following tools:
Git: You can find instructions on how to install Git here.
Node.js and npm: You can find instructions on how to install both using nvm (Node Version Manager) here. The current minimum version is 16. In case you already have Node.js and npm installed, you can check the current version with the following command:
node -v
npm -v
Note
Use node version 16.x and npm version 6.x. If using npm version 7+, you must enable legacy peer dependencies by setting: npm config set legacy-peer-deps true.
Lerna: You can install lerna globally with the following command:
npm install --global lerna@5.1.6
Selecting the Node
The first thing that we have to do is pick the service we want to create the node for. We will use SendGrid here as an example.
For the sake of brevity, we will only showcase how to add the functionality to create a contact. Since n8n’s repository already has a SendGrid node, we will name this node FriendGrid to avoid conflicts.
Cloning the Repository
In Energy SOAR repository download n8n development package by running the following command in your terminal (don’t forget to replace <USERNAME> and <PASSWORD> wih your repository credentials:
curl -O -u'<USERNAME>:<PASSWORD>' https://repo.energysoar.com/developers/n8n-latest.tar.gz
n8n is built from five main packages:
cli
core
editor-ui
nodes-base
nodes-energy
All these packages are under the /packages folder in the main n8n folder. We will be working in the nodes-energy folder as it contains custom Energy SOAR nodes Specifically, /packages/nodes-energy/nodes, packages/nodes-energy/credentials, and packages/nodes-energy/package.json.
The folder nodes contains all the nodes in n8n.
The folder credentials contains all the credentials that the different nodes use. Each node can define multiple credentials. For example, OAuth2 or API Key. Each credential requires different parameters that the user will have to input. The credentials data that the user provides is stored in an encrypted format in n8n’s database.
The file package.json contains all the npm packages that the nodes use. It also contains all the nodes and credentials that are loaded when n8n is started.
Creating the Node
Go to
packages/nodes-energy/nodes.Create a folder called FriendGrid (the folder names are PascalCase).
Within the FriendGrid folder, create a file called
FriendGrid.node.ts(YourNodeName.node.ts).Download and add the FriendGrid icon here to the folder. Name it
friendGrid.svg.The icon property has to be either a 60x60 pixels PNG or an SVG and must exist in the node’s folder.
An SVG is preferable. In case you have to use a PNG, make sure that it is compressed. A good tool for that is tinypng.
A good place to find company icons is gilbarbara/logos.
Paste the following code in the
FriendGrid.node.tsfile.
import {
    IExecuteFunctions,
} from 'n8n-core';

import {
    IDataObject,
    INodeExecutionData,
    INodeType,
    INodeTypeDescription,
} from 'n8n-workflow';

import {
    OptionsWithUri,
} from 'request';

export class FriendGrid implements INodeType {
    description: INodeTypeDescription = {
        displayName: 'FriendGrid',
        name: 'friendGrid',
        icon: 'file:friendGrid.svg',
        group: ['transform'],
        version: 1,
        description: 'Consume FriendGrid API',
        defaults: {
            name: 'FriendGrid',
            color: '#1A82e2',
        },
        inputs: ['main'],
        outputs: ['main'],
        credentials: [
            // Node credentials which the user gets displayed and
            // can change on the node.
        ],
        properties: [
            // Node properties which the user gets displayed and
            // can change on the node.
        ],
    };

    async execute(this: IExecuteFunctions): Promise<INodeExecutionData[][]> {
        return [[]];
    }
}
Your directory structure should now look like the following:
FriendGrid
- FriendGrid.node.ts
- friendGrid.svg
Adding the Node to Editor UI
n8n uses the properties set in the property description to render the node in the Editor UI. These properties are displayName, name, color, icon, description, and subtitle.
Let’s see how the node looks in the UI by following these steps:
Go to
/packages/nodes-energy/package.json.Paste “dist/nodes/FriendGrid/FriendGrid.node.js”, in the nodes array to register the node (in alphabetical order).
Go to the project’s main folder (n8n) in the terminal and run the following commands (it can take a few minutes): - The first command installs all dependencies of all the modules and links them together. - The second command builds all the code. - The third command starts n8n in development mode.
lerna bootstrap --hoist
npm run build
export N8N_CUSTOM_EXTENSIONS="/packages/nodes-energy"; npm run dev
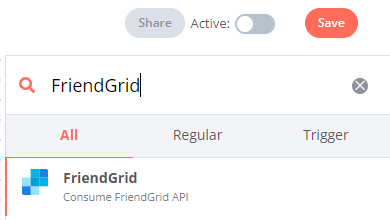
Open your browser and go to localhost:5678 and you should be able to see the Editor UI.
Open the Create Node menu, type FriendGrid, and click on it to add the node to the Editor UI.
Notes
On startup, n8n will load all the nodes and credentials (more about credentials later) that are registered in
/packages/nodes-energy/package.json.The property description.name uses camelCase.
The property description.color is the company branding’s hexadecimal color. This is usually available on the company’s website under style guide. In case the website does not include this information, there are other websites that help you get a company’s branding colors. For example, brandpalettes.com.
Creating the UI for the Node
Double-clicking on the FriendGrid node will open the Node Editor View. It will be empty since we haven’t added any UI components yet. Luckily, n8n provides predefined JSON-based UI components that we can use to ask the user for different types of data.
SendGrid’s docs here mention that to create a contact, we need to provide the following pieces of information:
email - Required
first_name - Optional
last_name - Optional
There are more parameters that can be provided to create a contact in FriendGrid, but we will use only these three in this tutorial.
Resources and Operations
Now, n8n requires a couple of parameters as well:
resource - Required
operation - Required
You can get the node to work without these two parameters, but these should be added for the sake of consistency with the other nodes. Resources and Operations help in organizing all the functionalities of a node. These ensure that all the functionalities of a node remain easily discoverable as the node grows.
The resource value is always singular and its value is the name of the API resource that we want to use. Since we are working with contacts, the resource value would be contact.
The operation value is always singular as well and it is the name of the operation to perform over the resource. Since we are creating contacts, the operation value would be create.
You might say that you can “Add a contact” and you are right, but we try to use the same operations (create, delete, get, getAll and update) across all the nodes.
Adding required fields
Let’s make the Node Editor View ask for these parameters:
Add the following under description.properties in packages/nodes-energy/nodes/FriendGrid/FriendGrid.node.ts.
{
    displayName: 'Resource',
    name: 'resource',
    type: 'options',
    options: [
        {
            name: 'Contact',
            value: 'contact',
        },
    ],
    default: 'contact',
    required: true,
    description: 'Resource to consume',
},
{
    displayName: 'Operation',
    name: 'operation',
    type: 'options',
    displayOptions: {
        show: {
            resource: [
                'contact',
            ],
        },
    },
    options: [
        {
            name: 'Create',
            value: 'create',
            description: 'Create a contact',
        },
    ],
    default: 'create',
    description: 'The operation to perform.',
},
{
    displayName: 'Email',
    name: 'email',
    type: 'string',
    required: true,
    displayOptions: {
        show: {
            operation: [
                'create',
            ],
            resource: [
                'contact',
            ],
        },
    },
    default: '',
    description: 'Primary email for the contact',
},
Stop the current n8n process by pressing ctrl + c in the terminal in which you are running n8n.
Run again, by entering the following in the terminal.
export N8N_CUSTOM_EXTENSIONS="/packages/nodes-energy"; npm run dev
Go to localhost:5678 (opens new window), refresh the page, and open the node again.
The node should now look like in the following image.
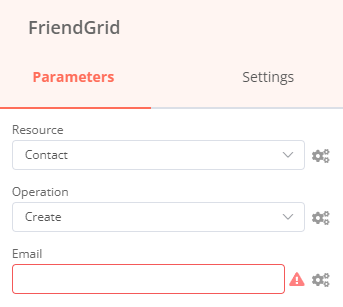
FriendGrid’s required fields
Adding optional fields
We have given the node the possibility to ask for all the required parameters needed to create a contact. But, what about the optional parameters?
We can add them below the email parameter and set required: false. However, if we had more than two optional parameters, and most APIs do, the UI would become overwhelming for the users. To avoid this, we use a UI element named collection (usually called ‘Additional Fields’) to group all the optional parameters together.
Add the following below the email field in packages/nodes-energy/nodes/FriendGrid/FriendGrid.node.ts.
{
    displayName: 'Additional Fields',
    name: 'additionalFields',
    type: 'collection',
    placeholder: 'Add Field',
    default: {},
    displayOptions: {
        show: {
            resource: [
                'contact',
            ],
            operation: [
                'create',
            ],
        },
    },
    options: [
        {
            displayName: 'First Name',
            name: 'firstName',
            type: 'string',
            default: '',
        },
        {
            displayName: 'Last Name',
            name: 'lastName',
            type: 'string',
            default: '',
        },
    ],
},
Stop the current n8n process by pressing ctrl + c in the terminal in which you are running n8n.
Run again, by entering the following in the terminal.
export N8N_CUSTOM_EXTENSIONS="/packages/nodes-energy"; npm run dev
Go to localhost:5678 (opens new window), refresh the page, and open the node again.
The node should now look like in the following image.
FriendGrid’s all fields
Now all our optional fields are presented in the UI and can be set individually depending on the user’s use-case.
Creating the UI for credentials
Most REST APIs use some sort of authentication mechanism. FriendGrid’s REST API uses API Keys. The API Key informs them about who is making the request to their system and gives you access to all the functionality that the API provides. Given all the things it can do, this has to be treated as a sensitive piece of information and should be kept private.
n8n gives you the ability to ask for sensitive information using credentials. In the credentials, you can use all the generally available UI elements. Additionally, the data that is stored using the credentials would be encrypted before being saved to the database. In order to do that, n8n uses an encryption key.
With that in mind, let’s create the UI to ask for the user’s FriendGrid API Key. The process of creating and registering credentials is similar to that of creating and registering the node:
Go to packages/nodes-energy/credentials.
Within the credentials folder, create a file named FriendGridApi.credentials.ts.
Paste the following code.
import {
    ICredentialType,
    NodePropertyTypes,
} from 'n8n-workflow';

export class FriendGridApi implements ICredentialType {
    name = 'friendGridApi';
    displayName = 'FriendGrid API';
    documentationUrl = 'friendGrid';
    properties = [
        {
            displayName: 'API Key',
            name: 'apiKey',
            type: 'string' as NodePropertyTypes,
            default: '',
        },
    ];
}
Go to /packages/nodes-energy/package.json.
Paste “dist/credentials/FriendGridApi.credentials.js”, in the credentials array to register the credentials (in an alphabetical order).
Got to packages/nodes-energy/nodes/FriendGrid/FriendGrid.node.ts.
Associate the credentials with the node by adding the following to description.credentials.
{
    name: 'friendGridApi',
    required: true,
},
Stop the current n8n process by pressing ctrl + c in the terminal in which you are running n8n.
Run again, by entering the following in the terminal.
export N8N_CUSTOM_EXTENSIONS="/packages/nodes-energy"; npm run dev
When you go to the Node Editor view, you should see the following. FriendGrid’s create credentials ——————————-
FriendGrid’s credentials
Mapping the UI fields to the API
With the UI that we added, we now have all the data that we need to make a request to the FriendGrid API and create contacts.
This is where the execute method comes into play. Every time the node is executed, this method will be run. Within this method, we can have access to the input items and to the parameters that the user set in the UI, including the credentials. To map the fields to the API, perform the following steps:
Go to package/nodes-energy/nodes/FriendGrid.node.ts.
Replace the current execute method with the following code.
async execute(this: IExecuteFunctions): Promise<INodeExecutionData[][]> {
    let responseData;
    const resource = this.getNodeParameter('resource', 0) as string;
    const operation = this.getNodeParameter('operation', 0) as string;
    // Get credentials the user provided for this node
    const credentials = await this.getCredentials('friendGridApi') as IDataObject;

    if (resource === 'contact') {
        if (operation === 'create') {
            // get email input
            const email = this.getNodeParameter('email', 0) as string;
            // get additional fields input
            const additionalFields = this.getNodeParameter('additionalFields', 0) as IDataObject;
            const data: IDataObject = {
                email,
            };

            Object.assign(data, additionalFields);

            // Make http request according to API reference
            const options: OptionsWithUri = {
                headers: {
                    'Accept': 'application/json',
                    'Authorization': `Bearer ${credentials.apiKey}`,
                },
                method: 'PUT',
                body: {
                    contacts: [
                        data,
                    ],
                },
                uri: `https://api.sendgrid.com/v3/marketing/contacts`,
                json: true,
            };

            responseData = await this.helpers.request(options);
        }
    }

    // Map data to n8n data
    return [this.helpers.returnJsonArray(responseData)];
}
Stop the current n8n process by pressing ctrl + c in the terminal in which you are running n8n.
Run again, by entering the following in the terminal.
export N8N_CUSTOM_EXTENSIONS="/packages/nodes-energy"; npm run dev
Enter the credentials (FriendGrid API Key), contact parameters, and execute the node. Instructions to find the FriendGrid API Key can be found here. If everything went well, you should see the following.
Creating a contact in FriendGrid with n8n
Now we can successfully create contacts in FriendGrid from n8n.
Processing multiples items
In real life, you’ll probably have a workflow with more than one node. Our current implementation does not play well with the other nodes. If the data is coming into our FriendGrid node from another node, and that outputs, for example, two contacts, our node will process just the first contact. We want our node to process as many items as it receives.
This is when the this.getInputData() function comes into play. Let’s update our node so that it can process multiple items.
In the Editor UI, create a new workflow. Add a Function node and connect it to the Start node. Open the function node and replace the existing code with the following.
return [
  {
    json: {
      name: 'ricardo@n8n.io'
    }
  },
  {
    json: {
      name: 'hello@n8n.io'
    }
  },
]
Execute the Function node. We’re using the function node for testing, but you can think of it as any node that is returning “two people” (or more). These two people need to be added to FriendGrid as contacts. Output of the Function node
Add a FriendGrid node to the workflow and connect it to the Function node. Add an expression in the Email field of the FriendGrid node and reference the name property that the Function node outputs. Using expressions in the FriendGrid node
Replace the existing execute method with the following:
async execute(this: IExecuteFunctions): Promise<INodeExecutionData[][]> {
    const items = this.getInputData();
    let responseData;
    const returnData = [];
    const resource = this.getNodeParameter('resource', 0) as string;
    const operation = this.getNodeParameter('operation', 0) as string;
    // Get credentials the user provided for this node
    const credentials = await this.getCredentials('friendGridApi') as IDataObject;

    for (let i = 0; i < items.length; i++) {
        if (resource === 'contact') {
            if (operation === 'create') {
                // get email input
                const email = this.getNodeParameter('email', i) as string;
                // get additional fields input
                const additionalFields = this.getNodeParameter('additionalFields', i) as IDataObject;
                const data: IDataObject = {
                    email,
                };

                Object.assign(data, additionalFields);

                // Make http request according to API reference
                const options: OptionsWithUri = {
                    headers: {
                        'Accept': 'application/json',
                        'Authorization': `Bearer ${credentials.apiKey}`,
                    },
                    method: 'PUT',
                    body: {
                        contacts: [
                            data,
                        ],
                    },
                    uri: `https://api.sendgrid.com/v3/marketing/contacts`,
                    json: true,
                };

                responseData = await this.helpers.request(options);
                returnData.push(responseData);
            }
        }
    }
    // Map data to n8n data structure
    return [this.helpers.returnJsonArray(returnData)];
}
Execute the workflow. If you open the FriendGrid node, you should see the following.
Output of the FriendGrid node
As showcased above, both the items were processed. That’s how all nodes in n8n work (with a few exceptions). They will automatically iterate over all the items and process them.
Let’s go over the final version of the execute method. We are getting the items returned by the this.getInputData() function and iterating over all of them. Additionally, while doing so, we use the item index to get the correct parameter value using the function this.getNodeParameters(). For example, with the following input:
[
  {
    json: {
      name: 'ricardo@n8n.io'
    }
  },
  {
    json: {
      name: 'hello@n8n.io'
    }
  },
]
The this.getNodeParameters(ParameterName, index) function outputs the following:
Index |
Parameter Name |
Output |
|---|---|---|
0 |
||
1 |
We used the this.helpers.request(options) method to make the HTTP Request that creates the contact in FriendGrid. The FriendGrid endpoint returns something like this:
{
   "job_id": "b82aca74-3640-4097-85ec-7801d833c2cb"
}
We then used the this.helpers.returnJsonArray() method to map the API’s output data to n8n’s data structure. The node then ends up returning the data like the following:
[
   {
      "json":{
         "job_id": "b82aca74-3640-4097-85ec-7801d833c2cb"
      }
   }
]
Summary
In this tutorial, we implemented the “Create a Contact” functionality of the FriendGrid API. First of all, we made the node show up in the Editor UI and in the Create Node menu with FriendGrid’s branding. Then, we added the fields necessary to create a contact in FriendGrid. We also added the credentials so that the API Key could be stored safely. Finally, we mapped all the parameters to the FriendGrid API.
This is just the tip of the iceberg. We built a regular node that consumes a REST API, but a regular node can do everything that can be done with Node.js. Aside from regular nodes you can also build Trigger nodes.